Tuesday, 2013-04-16
Quick-Hoop Bender Plans
Estimated Construction Time
Two to three hours, plus time for the glue and the finish to dry. Several weeks after building the prototype and writing up the plans, I built a second one from the plans and it took me about half an hour to lay out the pieces, an hour to cut them and clean up, and probably 15-20 minutes to get them glued up and clamped.Materials
- A half-sheet (four-foot square) of 5/8" or 3/4" plywood.
- Four machine screws 1-1/4" or 1-1/2" long (double the plywood thickness) with pronged tee nuts and washers (I used 1" fender washers).
- A 1-1/2" pipe strap or an approximately 6" strip of metal which you can bend into a loop, and a few screws to attach it to the bender.
- Wood glue.
- Optionally polyurethane or other finish.
Tools
- Pencil.
- Tape measure.
- Some sort of straight edge long enough (5'8") to draw the diagonal of a 4' square.
- Optionally a ruler to draw the 5" straight lines at the end of each piece.
- Claw hammer, small nail, and three foot piece of string to lay out the arcs.
- Jigsaw which can be angled to about 30 degrees.
- Clamps to hold the pieces together while gluing.
Layout
 Take the sheet
of plywood and draw a diagonal from the top left corner to the bottom
right corner. Measuring along the diagonal from the top left corner,
make marks at 15", 40.5", and 45.5". Take a three foot length of string
and tie a small loop in one end. Place the nail at the 15 inch mark,
slip the loop over it, and stretch the string along the diagonal. Use a
permanent marker to mark the string at the other two marks.
Take the sheet
of plywood and draw a diagonal from the top left corner to the bottom
right corner. Measuring along the diagonal from the top left corner,
make marks at 15", 40.5", and 45.5". Take a three foot length of string
and tie a small loop in one end. Place the nail at the 15 inch mark,
slip the loop over it, and stretch the string along the diagonal. Use a
permanent marker to mark the string at the other two marks.
 About 7" left from the top right corner, measure 7-3/4" down and make a
mark. About 7" up from the bottom left corner, measure 13-1/2" right
and make a mark.
About 7" left from the top right corner, measure 7-3/4" down and make a
mark. About 7" up from the bottom left corner, measure 13-1/2" right
and make a mark.
 Stretch the string out and put a pencil at the longer mark. Pinch the
string between your fingers and the pencil and use it to draw the outer
arc from one mark to the other. At each end, mark the end of inner arc
and draw a straight line connecting the two.
Stretch the string out and put a pencil at the longer mark. Pinch the
string between your fingers and the pencil and use it to draw the outer
arc from one mark to the other. At each end, mark the end of inner arc
and draw a straight line connecting the two.
 Then
place the pencil at the shorter mark and draw the inside arc.
Then
place the pencil at the shorter mark and draw the inside arc.
 Now for
the larger piece: remove the nail, measure 24" along the diagonal from
the top left corner and place it there.
Now for
the larger piece: remove the nail, measure 24" along the diagonal from
the top left corner and place it there.
A couple inches left from the top right corner, measure 7-5/16" down and make a mark. About 4" up from the bottom left corner, measure 3-3/8" right and make a mark.
 Again,
use the string and a pencil to draw the outer arc and the end lines,
then the inner arc.
Again,
use the string and a pencil to draw the outer arc and the end lines,
then the inner arc.
 Remove the
nail and rotate the plywood 180 degrees so we can draw the other two
pieces.
Remove the
nail and rotate the plywood 180 degrees so we can draw the other two
pieces.
 Let's
draw all the marks for both pieces at once. So measure 15" and 24"
along the diagonal from the (new) top-left corner.
Let's
draw all the marks for both pieces at once. So measure 15" and 24"
along the diagonal from the (new) top-left corner.
A couple inches left from the top right corner, measure 7-15/16" down and make a mark. Then move left a bit, measure 7-3/4" down and make another mark.
At the bottom right corner, go up about 4" measure right 3-3/8" and make a mark. Move up a bit, measure 13-1/2" right and make the second mark.
 Place the
nail at each center and draw both pieces.
Place the
nail at each center and draw both pieces.
Cutting and Assembly
 Now we're ready
to cut the pieces. The outside edges (the red lines) need to be cut
with your jigsaw blade angled in at 30° toward the inside of the
curve (so the bottom is narrower than the top). Cutting with the saw on
an angle like this can be tricky, so if you're going to be a
perfectionist about it you may want to take some practice cuts on a
scrap first.
Now we're ready
to cut the pieces. The outside edges (the red lines) need to be cut
with your jigsaw blade angled in at 30° toward the inside of the
curve (so the bottom is narrower than the top). Cutting with the saw on
an angle like this can be tricky, so if you're going to be a
perfectionist about it you may want to take some practice cuts on a
scrap first.
All the other lines will be cut with the blade set square to the wood as usual.
Then the pieces get glued together in pairs. Each small piece gets glued to a large piece so that the angled cuts form a V-shaped groove for the tubing to set in when we bend hoops. You want to align the pieces so that the V is as nice as possible; it doesn't matter if the inside edges don't line up. Use plenty of glue, as this will be under a fair amount of stress. Be sure to glue them so that both pieces look exactly the same! If they are mirror images (with the short piece at the left end on one and the right end on the other) then they won't fit together.
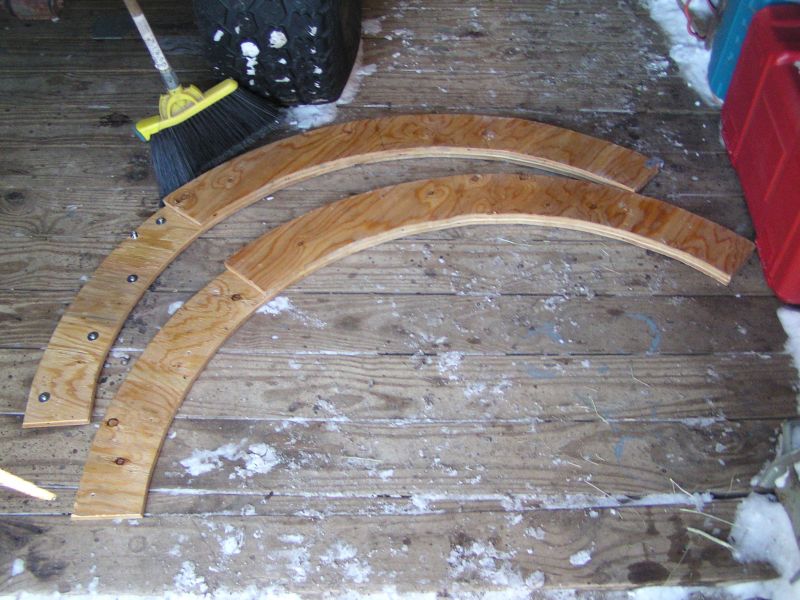
Once they are glued, fit the two pieces together. You will probably need to trim the long ends so they fit together nicely. Clamp them together and drill four holes for the machine screws and pronged tee nuts. You probably want to glue the tee nuts in so they can't fall out. You may also want to polyurethane or paint the pieces for protection from moisture...
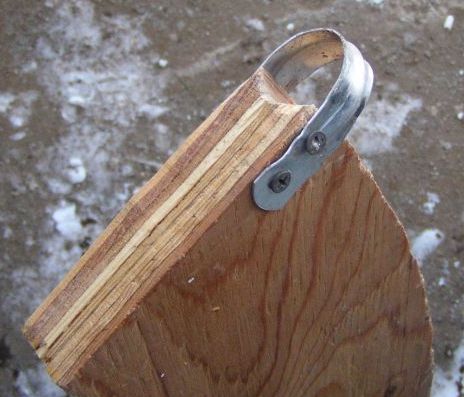
Then you need a loop of something to hold one end of the tubing while you bend it. I took a 1-1/2" pipe strap and bent the ends straight, but any strip of metal about 6" long would work.